

How I created an action role-playing game
Let's play neos! (Part 1 & 2)
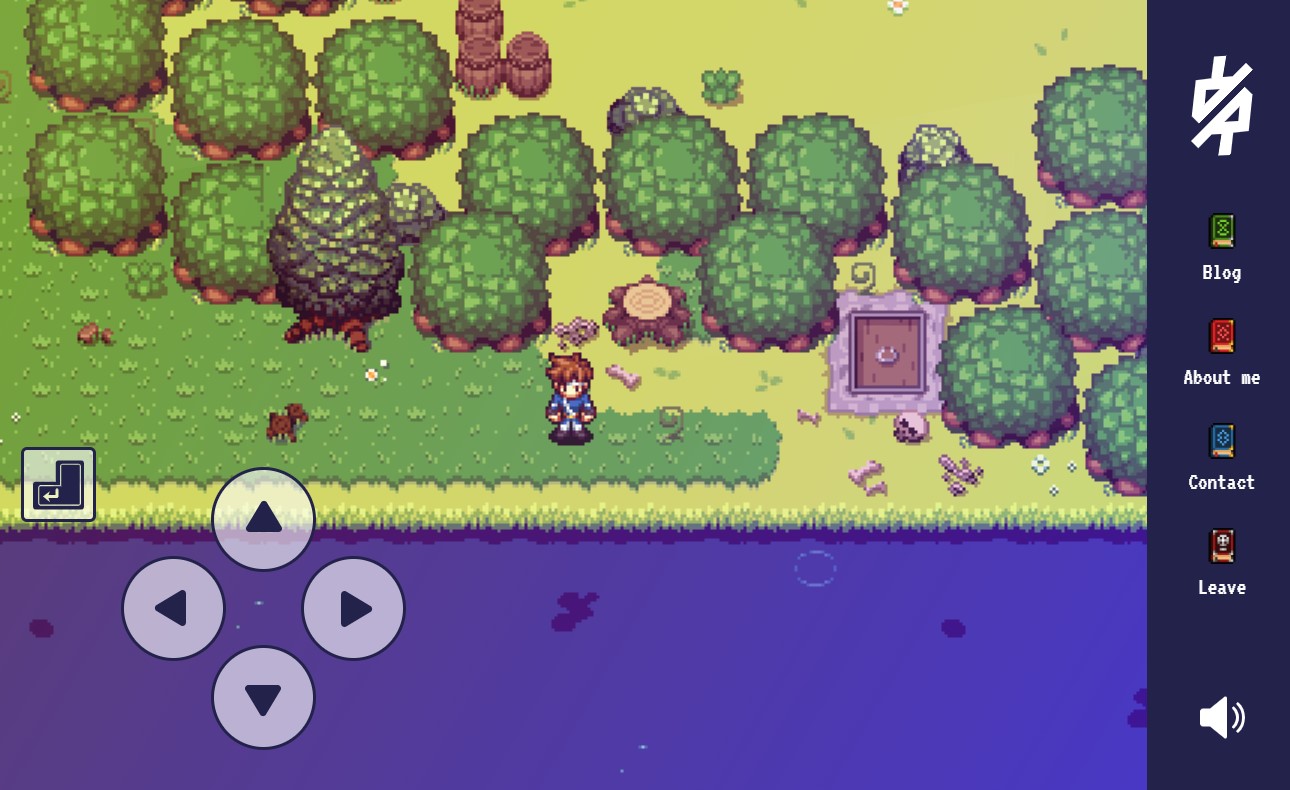
Did you notice that my website allows you to play an Action RPG? No? Then take a look at the footer.
When I started programming this blog, I thought about doing something special. So I started thinking about how to make this website more interesting for people. I asked myself: How cool would it be to have an Easter egg where the visitor can play and explore the website's content in an Action RPG?
Very cool! Now, this blog article is about the game development process. I'm still developing the game so I'll update this first part from time to time.
I recorded a video for the "Neos CMS Online Meetup V - Neos VI & Flow VII" showing the community the game in its early state. Some changes have been made since then. If you've already seen the video and found it interesting, you should read the article anyway :)
In this article series I will explain how I create the game and how I implemented this game in the Neos CMS. This is the first part ?.
This is the game
Bevor I started I had to read some articles about how RPGs were made in the 90s. What I've learned is that most of these games are actually based on tilemaps. So, we can create the game world from small, regularly shaped images, which are known as tiles. This means that large image files containing whole-layer maps are not required, as they are created multiple times from image fragments.
The most efficient way to store the tile images is with an atlas. These are all of the required tiles, combined into a single image file. When a tile is rendered in-game, it's only a small part of that larger image.
You can compare this technique to a spritesheet known from CSS sprites by using one single background-image and just changing the background-position for a corresponding element.
The following picture shows a tile atlas with 10 x 2 tiles. Some of these tiles* are used as backgrounds, others as objects or overlays in several layers. Different layers automatically create perspectives. In the follwong interaction demo this tile atlas is used as example.
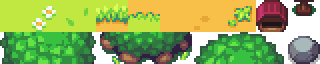
*Please note that some of these tiles are licenced. I bought them from itch.io. If you want, you can buy them there for your own use. Another great resource for tiles is GameDev Market.
Layer Demo (Interactive):
How is this interaction created? Check my CodePen.
In my game I'm using scrolling tilemaps. I had performance issues on my first try as it was difficult to draw scrolling tile maps on a large viewport without lags. For rendering the game im using a canvas element. I was loading the whole map at once, so the problem was that too much data had to be loaded on every Frame when the canvas was rendering the view. There are, however, techniques that can be used to keep scrolling smoothly. The approach was to draw only visible tiles. This means that the tiles are rendered individually in a canvas element via the Canvas API if required, so that unnecessary tiles do not have to be redrawn with each frame. So if you have a 10x10 visible grid, you should load 12x12 tiles to avoid a bleeding effect.
It was important to me that the world looks right and intended because it sets the mood and journey that the player experiences. I installed a software named tiled for creating the worldmap. This makes it very easy to put tiles in a grid because you can see what you do. At the end there is an export function which is basicly an array with Ids for each layer. I really recommend a software like Tiled for that.
What is the logic behind all this?
At first I have to say that my game is based on game developer technics I learned from mozilla dev articles, which helped me a lot. Some code snippets from there are still used in my code. There is no game engine or some kind of RPG lib used. This game is 100% based on native JavaScript and a bit of jQuery (I'll get rid of that soon).
To give you an overview of the basic structure (life cycle), you can take the following code as a guide to get an idea of it:
			// necessary stuff to run the game
Game.run = function (context) { /* this.load(); this.init(); this.tick(elapsed)  */ }
// load all important data
Game.load = function () { /* e.g interactions. See the following part 2 for an example: JsonLoader.loadJson('interactions') */ }
// init the game
Game.init = function () { /* id mappings, keyboard event listening, create hero, create camera, init game interface */ }
// keep the game alive
Game.tick = function (elapsed) { /* compute delta, update frames and stuff, render graphics: this.update(delta); this.render(); */ }
// update stuff
Game.update = function () { /* update hero position, detect hero interactions, update camera position */ }
// render graphics.
Game.render = function () { /* draw layers, render tile animations, draw the grid */ }
Interested in Game Development? Useful tutorials and technique articles can be found in the MDN game development center. If you want to know exactly how this game works, it is worth reading these articles.
Problems I faced
Due to the responsive implementation, the canvas element always takes up 100% of the browser width and height. This means that, despite the technology described above, there are currently performance problems if the game has to load too many tiles (e.g. with a high screen resolution). In addition, animated tiles require additional performance as the sesctios are constantly changing. I still have to work ? on this problem.
Let's improve this by expanding hard-coded functionality.
Neos is one of the best Content Application Platform I've worked with so far. And here you have a perfect example of how powerful this system is. I thought about making a few hard-coded passages from my game source code maintainable via Neos.
You don't know what neos is? Neos is a content management system. Some also call it an Content Application Platform. The underlying framework makes it possible to create individual extensions via (e.g.) own packages.
Well, there are many ways in which the system can be expanded. I'll show you mine. You can extend this CMS so easily that it is no problem to manage a game on it ?
Neos Backend
Management
I'll show you two screenshots of my extension in the neos backend. The next part is mainly about that backend module. As you can see there are already some general settings and a JSON builder for game interactions.


Part 2
Let's create a backend modul
Before we start this part, I need to briefly explain what I did and what has changed. Originally, much of the business logic in my game was hardcoded into JavaScript. This meant that when I changed the map, the interactions or settings, I always had to change and overwrite the hard-coded passages in the code. In the long run, it has always been my goal to configure and develop the game as well as possible using the Neos CMS. At least in the aforementioned points. I did this with this update. Here we go!
Well, there are many ways in which the neos system can be expanded. We can extend this CMS so easily that it is no problem to manage a game on it ?
First I configured a new submodule called gamemodule, which directly creates a new navigation entry in the neos backend navigation:
			Neos:
  Neos:
    modules:
      'management':
        submodules:
          'gamemodule':
            label: 'Game'
            controller: 'Rehme\Renerehme\Controller\GameController'
            description: 'Game Management'
            icon: 'fa fa-gamepad'
Next, I created an action controller and injected the repositories for the models I created for the game. Later, when I submit a form in the backend module, I can use the following update actions to update the delivered model object via the repository and trigger a flash message to get a response in the Neos backend:
			namespace Rehme\Renerehme\Controller;

/*
 * This file is part of the Rehme.Renerehme package.
 */

use Rehme\Renerehme\Domain\Repository\GameSettingsRepository;
use Rehme\Renerehme\Domain\Repository\GameJsonRepository;
use Rehme\Renerehme\Domain\Model\GameJson;
use Rehme\Renerehme\Domain\Model\GameSettings;
use Neos\Flow\Annotations as Flow;
use Neos\Flow\Mvc\Controller\ActionController;

class GameController extends ActionController
{
    /**
     * @Flow\Inject
     * @var GameSettingsRepository
     */
    protected $gameSettingsRepository;

    /**
     * @Flow\Inject
     * @var GameJsonRepository
     */
    protected $gameJsonRepository;

    /**
     * Index
     */
    public function indexAction(): void
    {
        $this->view->assign('gameSettings', $this->gameSettingsRepository->findAll()->getFirst());
        $this->view->assign('gameInteractions', $this->gameJsonRepository->findOneByTitle('interactions'));
        $this->view->assign('gameQuests', $this->gameJsonRepository->findOneByTitle('quests'));
        $this->view->assign('gameMaps', $this->gameJsonRepository->findOneByTitle('maps'));
    }

    /**
     * Update game settings
     * @param GameSettings $gameSettings
     */
    public function updateGameSettingsAction(GameSettings $gameSettings): void
    {
        $this->gameSettingsRepository->update($gameSettings);
        $this->addFlashMessage('Updated general game settings.');
        $this->redirect('index');
    }

    /**
     * Update game interactions
     * @param GameJson $gameJson
     */
    public function updateGameInteractionsAction(GameJson $gameJson): void
    {
        $this->gameJsonRepository->update($gameJson);
        $this->addFlashMessage('Updated interaction settings.');
        $this->redirect('index');
    }

    /**
     * Update game maps
     * @param GameJson $gameMaps
     */
    public function updateGameMapsAction(GameJson $gameMaps): void
    {
        $this->gameJsonRepository->update($gameMaps);
        $this->addFlashMessage('Updated game maps.');
        $this->redirect('index');
    }
}
Since the game expects data in JSON format, all information is communicated as JSON strings via classic models with getter and setter methods. The respective JSON data records are identified via "title" in the object.
			namespace Rehme\Renerehme\Domain\Model;

/*
 * This file is part of the Rehme.Renerehme package.
 */

use Doctrine\ORM\Mapping as ORM;
use Neos\Flow\Annotations as Flow;
use Neos\Neos\Domain\Service;

/**
 * Class GameJson
 * @Flow\Entity
 */
class GameJson
{
    const JSON_EMPTY = '{}';

    /**
     * Title
     * @var string
     * @Flow\Validate(type="NotEmpty")
     */
    protected $title = '';

    /**
     * JSON
     * @var string
     * @ORM\Column(type="text")
     * @Flow\Validate(type="NotEmpty")
     */
    protected $json = self::JSON_EMPTY;

    /**
     * Returns the title
     * @return string
     */
    public function getTitle() : string
    {
        return $this->title;
    }

    /**
     * Sets the title
     * @param string $title
     */
    public function setTitle(string $title) : void
    {
        $this->title = $title;
    }

    /**
     * Returns the JSON
     * @return string
     */
    public function getJson() : string
    {
        return $this->json;
    }

    /**
     * Sets the JSON
     * @param string $json
     */
    public function setJson(string $json) : void
    {
        $this->json = $json;
    }

    /**
     * Checks if JSON is empty
     * @return boolean
     */
    public function jsonIsEmpty() : bool
    {
        return $this->json === self::JSON_EMPTY;
    }
}
By running a create command from the console, I can specify what information should be generated first. That was very helpful during my tests and for golive of all of these additional logic. So I wrote a command controller for it.
			namespace Rehme\Renerehme\Command;

/*
 * This file is part of the Rehme.Renerehme package.
 */

use Rehme\Renerehme\Domain\Repository\GameSettingsRepository;
use Rehme\Renerehme\Domain\Repository\GameJsonRepository;
use Rehme\Renerehme\Domain\Model\GameJson;
use Rehme\Renerehme\Domain\Model\GameSettings;
use Neos\Flow\Package\PackageManager;
use Neos\Flow\Annotations as Flow;
use Neos\Flow\Cli\CommandController;
use Neos\Flow\Cli\Request;
use Neos\Flow\Cli\Response;
use Neos\Flow\Persistence\PersistenceManagerInterface;
use Neos\Flow\Mvc\Routing\ObjectPathMappingRepository as ObjectPathMappingRepository;

/**
 * Game Command Controller
 */
class GameCommandController extends CommandController
{

    /**
     * @Flow\Inject
     * @var GameSettingsRepository
     */
    protected $gameSettingsRepository;

    /**
     * @Flow\Inject
     * @var GameJsonRepository
     */
    protected $gameJsonRepository;

    /**
     * Create JSON entries
     * @return void
     */
    public function createCommand(): void
    {
        // ask for creating game settings
        $response = null;
        while (!in_array($response, ['y', 'n', 'c'])) {
            $response = $this->output->ask('Create GameSettings data? (y/n/c) ');
        }
        // handle the response
        switch ($response) {
            case 'y':
                // search for existing game settings
                $removedGameSettings = 0;
                $gameSettings = $this->gameSettingsRepository->findAll()->toArray();
                foreach($gameSettings as $gameSetting) {
                    // remove all existing game settings
                    $this->gameSettingsRepository->remove($gameSetting);
                    $removedGameSettings++;
                }
                // create game settings
                $newGameSettings = new GameSettings();
                $newGameSettings->setDebugMode(false);
                $newGameSettings->setHeroSpeed(200);
                $newGameSettings->setShowKeyboard(true);
                $newGameSettings->setSound(true);
                $this->gameSettingsRepository->add($newGameSettings);
                $this->outputLine('Removed %s entries and created a new GameSettings entry.', [$removedGameSettings]);
                break;
            case 'n':
                $this->outputLine('Nope, ok next.');
                break;
            case 'c':
                $this->outputLine('Canceled.');
                $this->quit(0);
                break;
        }

        // ask for creating json data
        $response = null;
        while (!in_array($response, ['y', 'n', 'c'])) {
            $response = $this->output->ask('Create GameJson data? (y/n/c) ');
        }
        // handle the response
        switch ($response) {
            case 'y':
                // search for existing json entries
                $removedGameJson = 0;
                $gameJson = $this->gameJsonRepository->findAll()->toArray();
                foreach($gameJson as $json) {
                    // remove all existing json entries
                    $this->gameJsonRepository->remove($json);
                    $removedGameJson++;
                }
                // create game json entries
                $settingTitles = array('interactions', 'quests', 'maps');
                foreach($settingTitles as $title) {
                    $newGameJson = new GameJson();
                    $newGameJson->setTitle($title);
                    $newGameJson->setJson('{}');
                    $this->gameJsonRepository->add($newGameJson);
                }
                $this->outputLine('Removed %s entries and created new GameJson entries.', [$removedGameJson]);
                break;
            case 'n':
                $this->outputLine('Nope. Done.');
                break;
            case 'c':
                $this->outputLine('Canceled.');
                $this->quit(0);
                break;
        }
    }
}
In Neos Flow we can define guidelines to ensure that our controller methods can only be executed (requested) through our specifications in the policy.yaml settings. To do this, I had to define some Roles and Privilege Targets for my controllers. The API controller can be addressed by the client through the following provisions. The game controller for the backend is protected by Neos authentication.
			privilegeTargets:
  Neos\Neos\Security\Authorization\Privilege\ModulePrivilege:
    'Rehme.Renerehme:GameBackendModule':
      matcher: 'management/gamemodule'
  Neos\Flow\Security\Authorization\Privilege\Method\MethodPrivilege:
    'Rehme.Renerehme:Api':
      matcher: 'method(Rehme\Renerehme\Controller\ApiController->.*Action())'

roles:
  'Neos.Neos:Editor':
    privileges:
      -
        privilegeTarget: 'Rehme.Renerehme:GameBackendModule'
        permission: GRANT

  'Neos.Flow:Everybody':
    privileges:
      -
        privilegeTarget: 'Rehme.Renerehme:Api'
        permission: GRANT
As a result of my refactoring, quests, interactions, maps and settings are now requested in the form of JSON strings on the client side through Javascript. In order for this to work, the data is obtained through Ajax requests. The API controller is addressed for this purpose.
To build urls for api calls, i had to create routes. By defining routes, a request passes the router and ask for the correct package, controller and action.
			-
  name: 'get interactions'
  uriPattern: 'api/getgameinteractions.{@format}'
  defaults:
    '@package': 'Rehme.Renerehme'
    '@controller': 'Api'
    '@action': 'getGameInteractionJson'
    '@format': 'json'

-
  name: 'get quests'
  uriPattern: 'api/getgamequests.{@format}'
  defaults:
    '@package': 'Rehme.Renerehme'
    '@controller': 'Api'
    '@action': 'getGameQuestJson'
    '@format': 'json'

-
  name: 'get maps'
  uriPattern: 'api/getgamemaps.{@format}'
  defaults:
    '@package': 'Rehme.Renerehme'
    '@controller': 'Api'
    '@action': 'getGameMapsJson'
    '@format': 'json'
Let's go shortly into the javascript part where the logic for the game is implemented. The json data is requested in a loadJson function which is finally fired in Game.load(). To get the data when its necessary, im using a simple getJson function. The loader looks like this:
			JsonLoader.loadJson = function (key) {
    var loaderInstance = this;
    var d = new Promise(function(resolve, reject) {
        $.ajax({
            url: 'api/getgame'+key+'.json',
            type: 'POST',
            data: {
                key: 'value',
            },
            success: function (data) {
                // example for load interactions
                let jsonData = JSON.parse(data);
                let jsonDataCollisionIds = [];
                jsonData.forEach(function(obj) {
                    jsonDataCollisionIds.push(obj.collisionId)
                });
                loaderInstance.jsonStrings['interactionIds'] = JSON.stringify(jsonDataCollisionIds);
                (GAME_DEBUG) ? console.log(JSON.stringify(jsonDataCollisionIds)) : null;

                loaderInstance.jsonStrings[key] = data;
                resolve(data);
            },
            error: function (error) {
                reject('Could not load json for key: ' + key);
            },
        })
    }.bind(this));
    return d;
};

Game.load = function () {
    return [JsonLoader.loadJson('interactions')];
};
One of the main functions of my game is to display blog articles and content pages from my website in the game. In order for this to be possible, the corresponding nodes must be read out from the neos CMS. To do this, I wrote the "getHtmlByIdentifier" action in my API controller.
The logic is simple: I use a FlowQuery to search for the appropriate node with the UUID and render the HTML with FusionView.
			/**
 * Get HTML from blog post
 * @param string $identifier uuid
 * @return string rendered html
 */
public function getHtmlByIdentifierAction(string $identifier): string
{
    // check for valid identifier
    if (preg_match(UuidValidator::PATTERN_MATCH_UUID, $identifier) !== 0) {
        // create the context
        $context = $this->contextFactory->create(
            array(
                'workspaceName' => 'live',
                'currentDateTime' => new Now(),
                'dimensions' => array(),
                'invisibleContentShown' => false,
                'removedContentShown' => false,
                'inaccessibleContentShown' => false
            )
        );

        // try to find a node with the given identifier via FlowQuery
        $query = new FlowQuery([$context->getCurrentSiteNode()]);
        $documentNode = $query->find('#'.$identifier)->get(0);

        if($documentNode) {
            // check if the node is a Post or Page nodeType
            $documentName = $documentNode->getNodeType()->getName();

            if($documentName == 'Rehme.Renerehme:Post' || $documentName == 'Rehme.Renerehme:Page') {
                // get the main path from child nodes
                $childNodes = $documentNode->getChildNodes();
                $mainPath = $childNodes[0];

                // create a FusionView and assign the mainPath
                $fusionView = new FusionView();
                $fusionView->setControllerContext(new ControllerContext(
                    $this->uriBuilder->getRequest(),
                    new Response(),
                    new Arguments(array()),
                    $this->uriBuilder
                ));
                $fusionView->assign('value', $mainPath);
                $fusionView->setFusionPath('<' . $mainPath->getNodeType() . '>');

                // render raw html
                return $fusionView->render();
            }
        }
    }
    return '';
}
So that the action can be addressed via an AJAX request, an entry is again required in Routes.yaml
			-
  name: 'get rendered html'
  uriPattern: 'api/getcontentbyid'
  defaults:
    '@package': 'Rehme.Renerehme'
    '@controller': 'Api'
    '@action': 'getHtmlByIdentifier'
    '@format': ''
Finally, it should be said that I of course need a node type for the game in order to create the initial page element. Since I have now outsourced all settings to my own models, I no longer need NodeType properies.
			'Rehme.Renerehme:Game':
  superTypes:
    'Rehme.Renerehme:Page': TRUE
  ui:
    label: 'Game'
    inspector:
      groups:
        settings:
          label: 'Game settings'
          icon: 'icon-cogs'
          position: last
Final words
By refactoring the JavaScript code, I was able to reduce the total script size from 16,6kb to 5,0kb.
Thanks to the community, I can improve this game and make it better and better.
Nico Grienauer from the Drupal Austria Association e.g. gave me some helpfull feedback:
"very nice! I think the communication system needs a bit of improvement. Maybe that you can move away when you have have hit return without having to wait/press return again. It happened to me that i had to go through texts more than once, because return startet it again."
He was right. I didn't noticed that, so I completely rebuilt this logic. You can now cancel an interaction at any time by clicking the ESC button (on your device or on the ESC button displayed in the game).
If you also have tips for improvement, feel free to contact me on twitter or email.
Thanks for reading ❤️
Ongoing improvement
In this section I will write down any improvements I have made in the future.
